CNC
The CNC area is for flat-panel milling, drilling, and routing — cutting parts out of sheet material (MDF, plywood, etc.) from a digital file, rather than by hand. Use it instead of the woodworking tools when you need repeatable precision, complex/curved shapes, or to nest many parts efficiently out of one board.
Machines
Mekanika Fab CNC
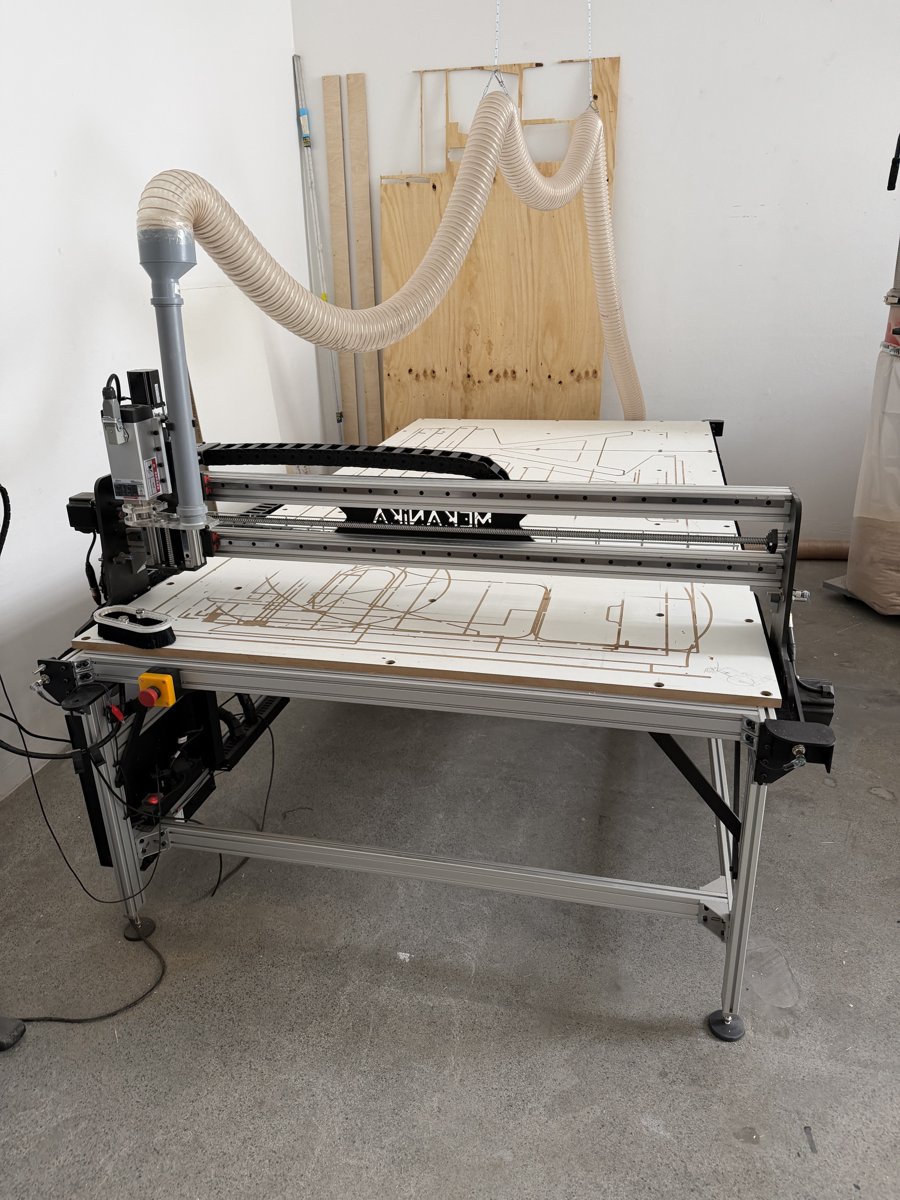
Location: [where in the shop] Training required: Yes — hands-on sign-off with a shop lead covering homing/squaring, tool changes, zeroing, and safety before independent use. You check in on the machine via the Fabman terminal mounted on it (tap/scan your member QR code) before you can start the spindle.
Overview The Fab is Mekanika's large-format CNC router — a gantry-style machine that mills, drills, and contour-cuts flat panel material (MDF, plywood, composites) using swappable router bits held in collets. It has its own onboard control computer (a Raspberry Pi running Planet CNC TNG) built into the machine, with a touchscreen, mouse, and a physical jog pendant/keyboard — you don't need to bring a laptop to run a job, only the finished G-code file.
Key Specifications
| Spec | Value |
|---|---|
| Work area | 1330 × 2700 mm |
| Max Z travel | 230 mm |
| Max stock thickness | 90 mm |
| Spindle | Air-cooled router spindle, collet-based tool holding (1–13 mm collets available) |
| Controller/software | Onboard Raspberry Pi running Planet CNC TNG (see Software section below) |
| Max travel speed | Up to ~20,000 mm/min (rapids) per Mekanika spec |
Basic Operating Steps
The machine is unforgiving of skipped steps — always do these in order.
- Power on. The switch in the bottom-left of the machine's base turns on the control computer (the Pi) and display only — it does not start the spindle. Before doing anything else, make sure nothing is leaning on or resting on the machine, and that nothing is taller than the Z-axis gantry bar.
- Home, then immediately Square. Press Home on the pendant/keyboard — the machine drives Z, then X, then Y to their end stops. As soon as homing finishes, press Square next, with nothing else in between. Squaring re-synchronizes the two independent motors that drive the Y-axis (the gantry is too wide for a single motor), correcting any small drift between them. Only ever press Square immediately after a fresh Home — pressing it any other time can cause the machine to think an end stop has failed and freeze the Y-axis (if that happens, stop and get a shop lead, don't dig into machine settings yourself). Tip: if the gantry is sitting at the far end of the bed, jog it closer to the front/home corner first — homing from the far end works but is slow.
- Load your G-code file from your thumb drive. Plug your USB thumb drive into the control computer (or, if you designed on the shared Makerspace computer, your file may already be there). On the touchscreen, use the load icon (top-left corner, next to the close/X button) or the G-code key on the keyboard, browse to your file, and open it. The toolpath preview should appear in the viewport — if you only see a dotted line/side view, click the top-view icon and zoom out until you can see the full bed. Loading a file references it to whatever the current XY zero point is, so do this after homing/squaring, and double-check the zero (see next step) before you fully trust the preview.
- Position and secure your material. Use the fixed registration corner/dowel holes built into the bed, together with the Zero Point Reference Guide (the alignment jig hanging on the collet/wrench board — see photo below) to butt your material into the same bottom-left corner every time — this is what lets everyone share one saved zero point without re-measuring. Screw material down (screws, not the nail gun, for general member use) using screws long enough to bite into the spoilboard but not so long they reach the aluminum frame underneath (e.g. 30 mm screws for 20 mm-thick material on the 20 mm spoilboard). Keep screws away from anywhere your toolpath will actually cut, and back a screw out and redrive it if it lifts the material off the bed instead of sinking flush.
- Confirm the XY zero point. Do not press the "set XY zero" button (XY icon with a small square + two arrows) — that would overwrite the shared reference point for everyone. Instead press travel to XY zero (XY icon with a target/crosshair) so the spindle moves to the corner of your material. Visually confirm the spindle is sitting over your material's actual zero corner. If the shared zero point is ever wrong, don't fix it yourself — ask a shop lead to reload it.
- Install your first tool. Pick the collet matching your bit's shaft diameter from the labeled collet holder (1 mm–13 mm; slightly undersized is fine — e.g. a 3.5 mm shaft in a 4 mm collet). Fit the collet into the collet sleeve before inserting the tool — you cannot get the collet into the sleeve with the tool already through it. Leave 2–3 mm of shaft clearance from the tool's cutting flutes so chips have somewhere to evacuate. Cup a hand under the tool as you seat it in the spindle in case it slips. Use the two wrenches (stored at the reference-jig board) to tighten — larger wrench on the bottom holding the spindle, smaller wrench on top turning the collet nut. Hand-tight only: over-tightening actually loosens the grip (it deforms the collet so it grips only a point instead of the full length of the shaft). If you have to fight to loosen it afterward, you tightened it too hard.
- Measure tool length (Z zero). Move the spindle out over the bare machine bed (not your material). Before using the fixed conductive Z-probe, make sure your tool is electrically conductive (steel and carbide both are; a coated/exotic bit might not be) — if you're unsure, check continuity with a multimeter from the electronics bench first, or manually jog down slowly with a finger on the emergency stop, watching for the first sign of contact. Press the tool-measurement button (ruler icon with a down arrow), hold the probe's wire steady against the tool so it doesn't fall away as the tool descends, and let it probe down and back up automatically. Drop the jog speed (e.g. to 1K instead of 10K steps) if you want more reaction time to hit emergency stop.
- Start the spindle, then start the program. Tap your membership card at the machine to enable the spindle (this is separate from the Fabman check-in). Before pressing play, listen for the spindle motor — it's loud, and you should clearly hear it spin up. If you start the program without the spindle on, it will pause automatically on the line where it tries to turn the spindle on (you'll see something like
S20000 M3highlighted) for a few seconds before continuing regardless — that pause is your last chance to hit emergency stop before a stationary bit gets driven into your material. - Run the job, dust collection as needed. Turn on the dedicated CNC vacuum for any real milling/routing/pocketing pass — for a quick, light job like drilling a few small holes it's reasonable to leave it off so you can see what's happening, but default to running it. See the dust shoe note below.
- Multi-tool jobs need manual intervention (current limitation). The default Mekanika/VCarve post-processor does not fully automate tool changes — it pauses the program (
M1) and raises Z, but does not reliably call up the new tool's radius/offset from the tool library. In practice: when the program pauses for a tool change, swap the bit (steps 6–7 again), re-measure Z on the bed, then resume. Because of this, prefer single-tool programs where practical, and always double check, in the loaded G-code view, that a tool change shows a highlighted comment block and a corresponding tool (T) reference — if theTreference for the new tool isn't there, the radius offset from the old tool is still active and your cut will be wrong by the difference in bit radius. - Clean up when done. Detach the vacuum hose from the spindle dust shoe by pulling straight up (a gray PVC collar stays on the machine; snap the hose back into its holder next to the machine when finished — don't carry it back to the woodworking area, it's dedicated to this machine). Sweep/vacuum sawdust off the bed for the next person. Never vacuum up drywall dust, screws, or other debris unrelated to this machine — the collector's filter is coarse and clogs easily, and it's a shared/limited-capacity bag.
Reference photos
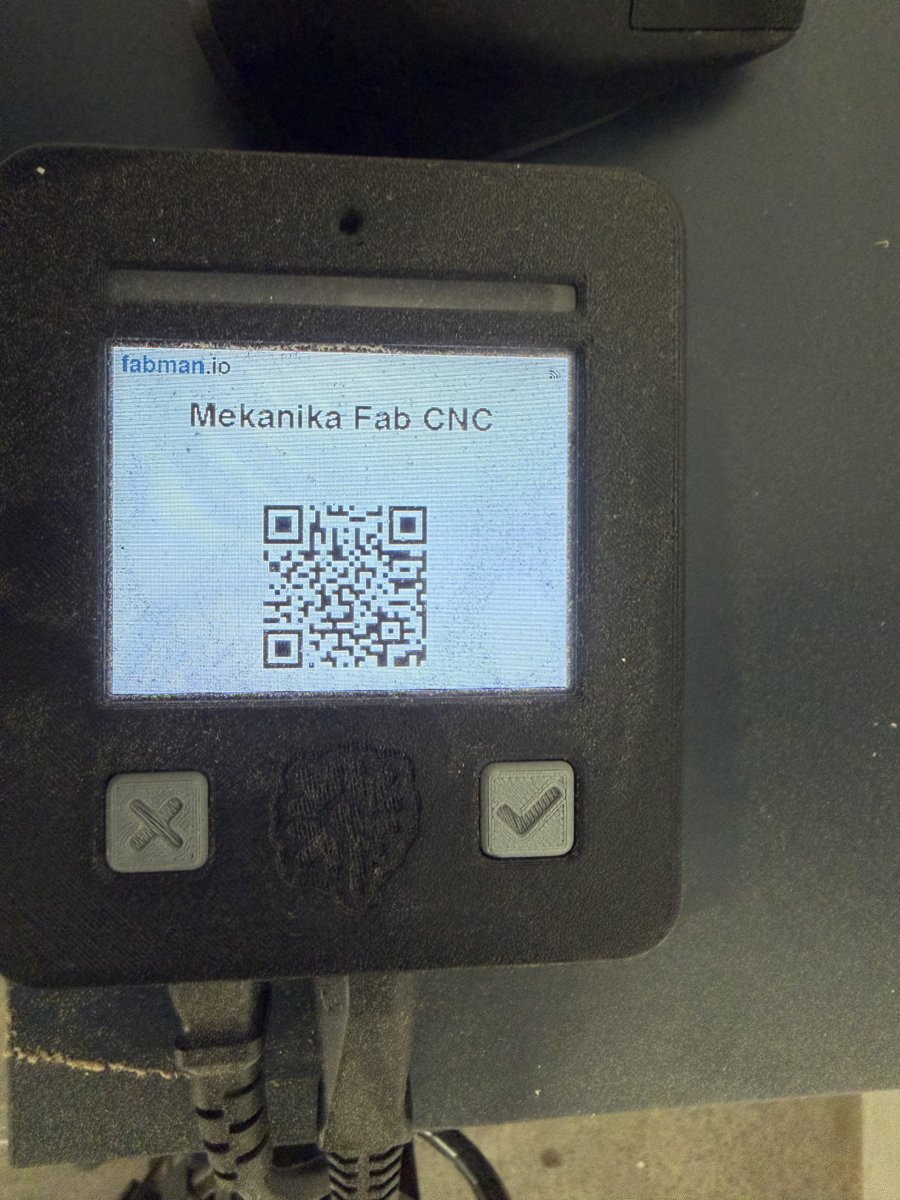 Tap/scan in at the Fabman terminal before starting the spindle. Tap/scan in at the Fabman terminal before starting the spindle. |
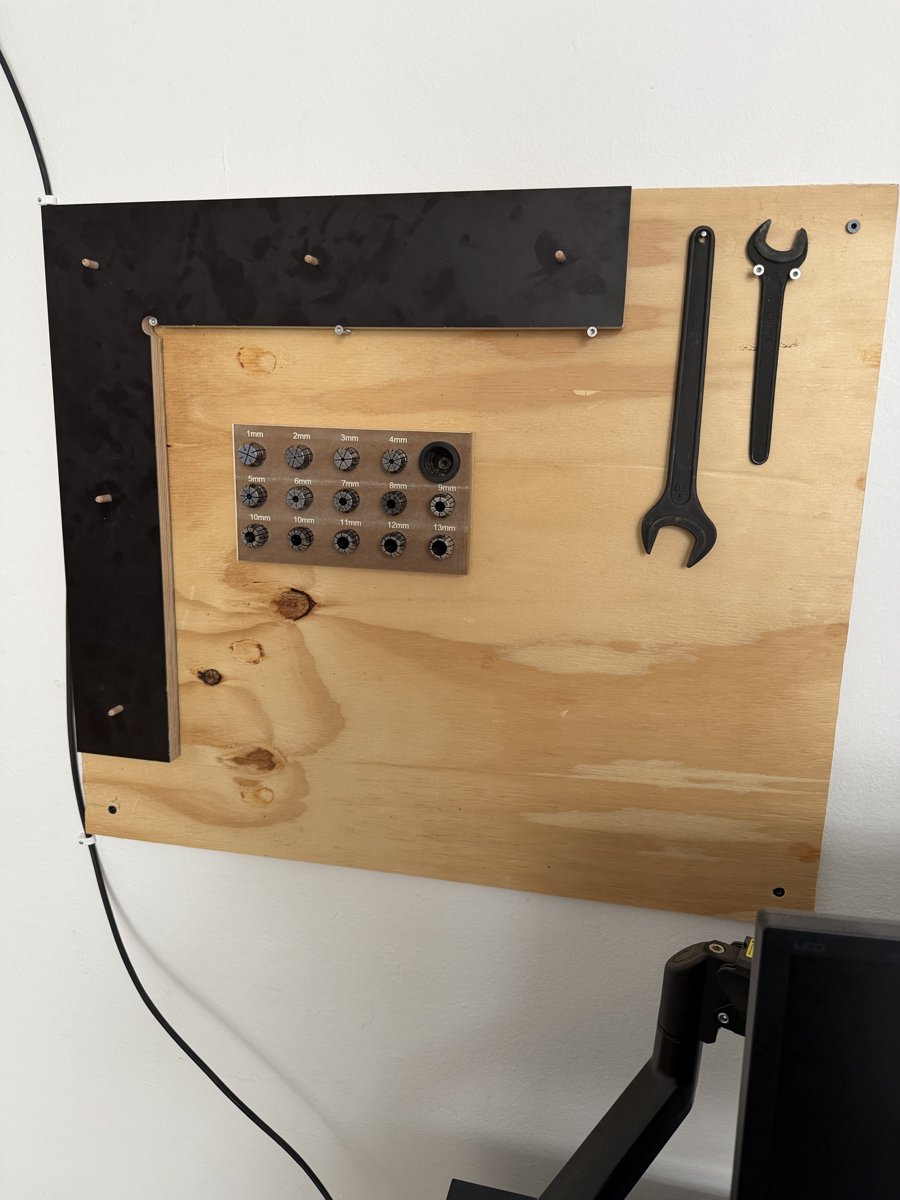 Collets (1–13 mm) and the two spindle/collet wrenches — this board also holds the Zero Point Reference Guide, the physical alignment jig used to register material to the shared XY zero point (see step 4). Collets (1–13 mm) and the two spindle/collet wrenches — this board also holds the Zero Point Reference Guide, the physical alignment jig used to register material to the shared XY zero point (see step 4). |
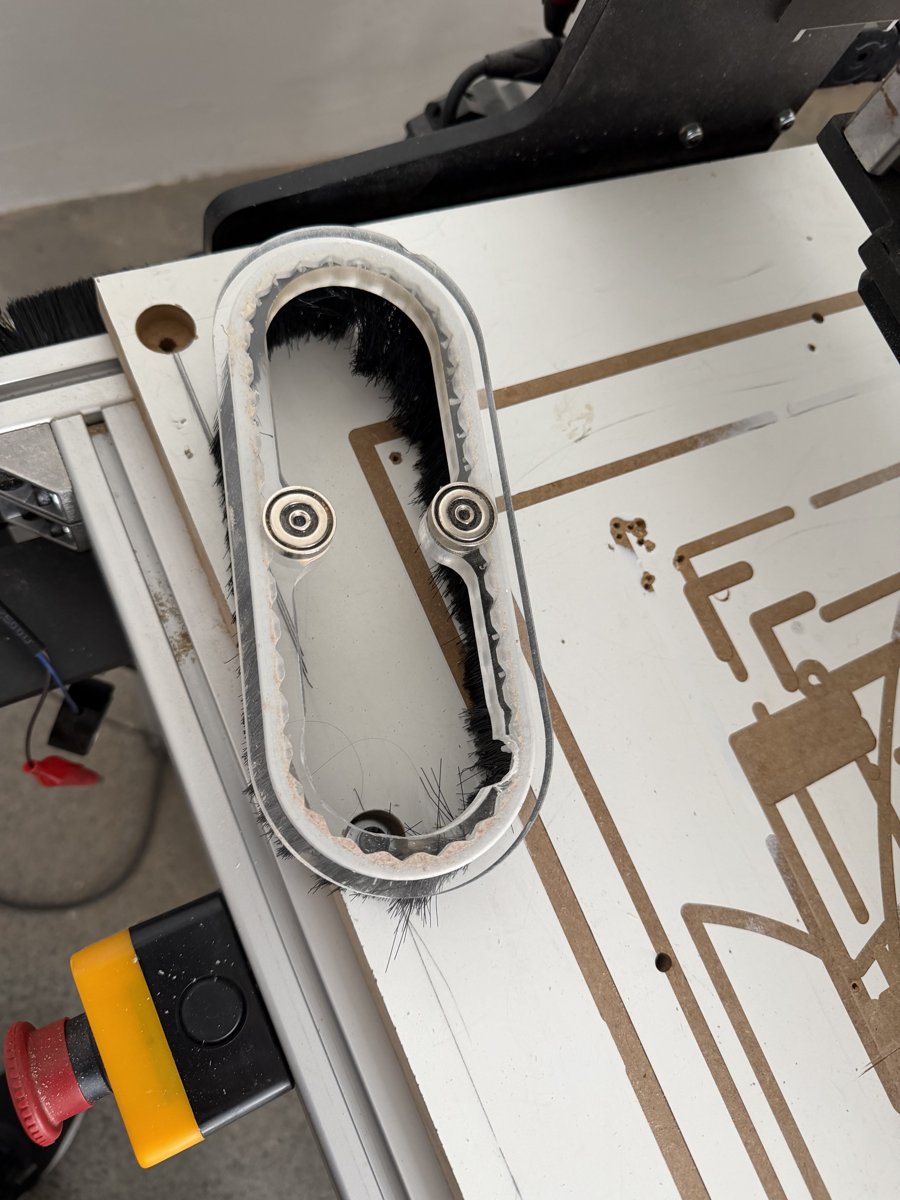 Dust shoe brush skirt around the spindle — must seat fully and connect to the vacuum hose for any real milling pass. Dust shoe brush skirt around the spindle — must seat fully and connect to the vacuum hose for any real milling pass. |
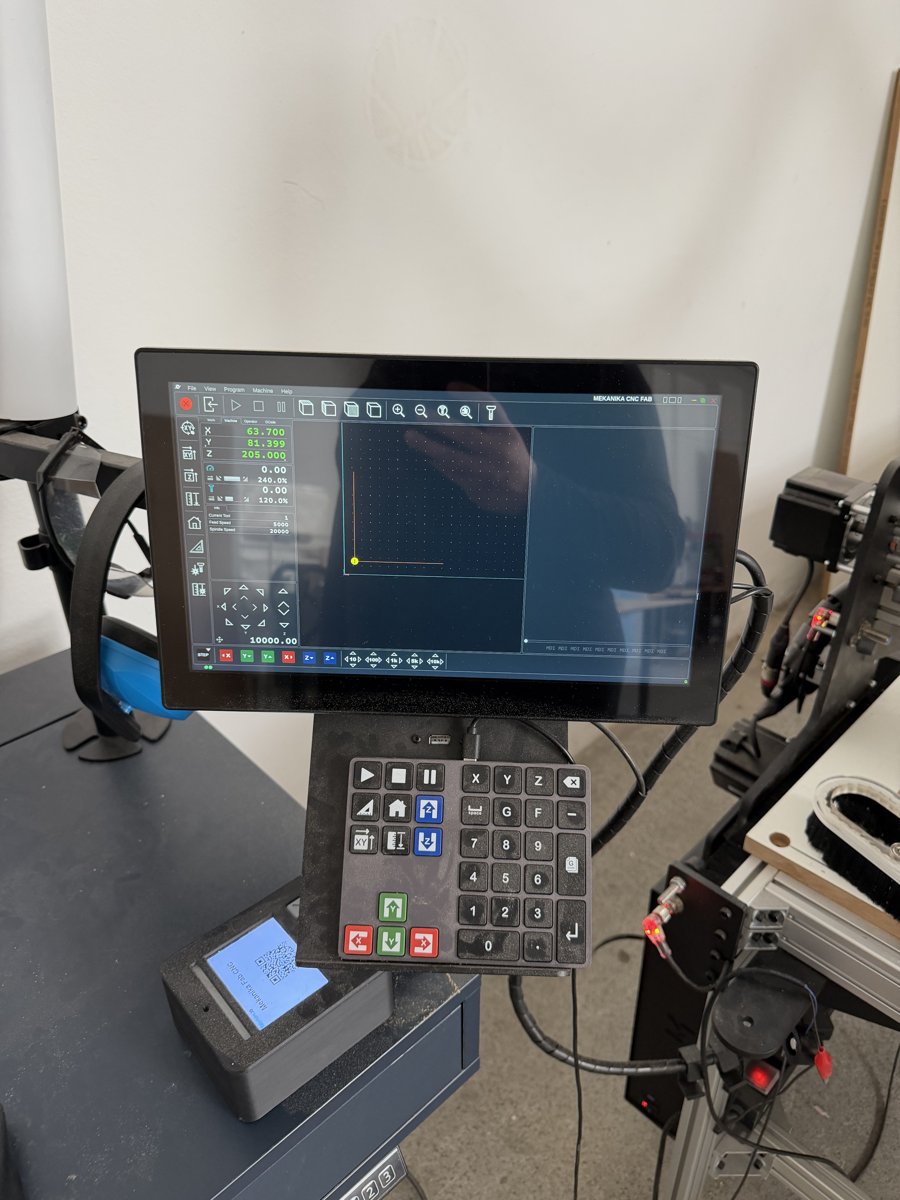 Onboard display and jog pendant running Planet CNC TNG — Home, Square, XY-zero, and tool-measurement buttons live here. Onboard display and jog pendant running Planet CNC TNG — Home, Square, XY-zero, and tool-measurement buttons live here. |
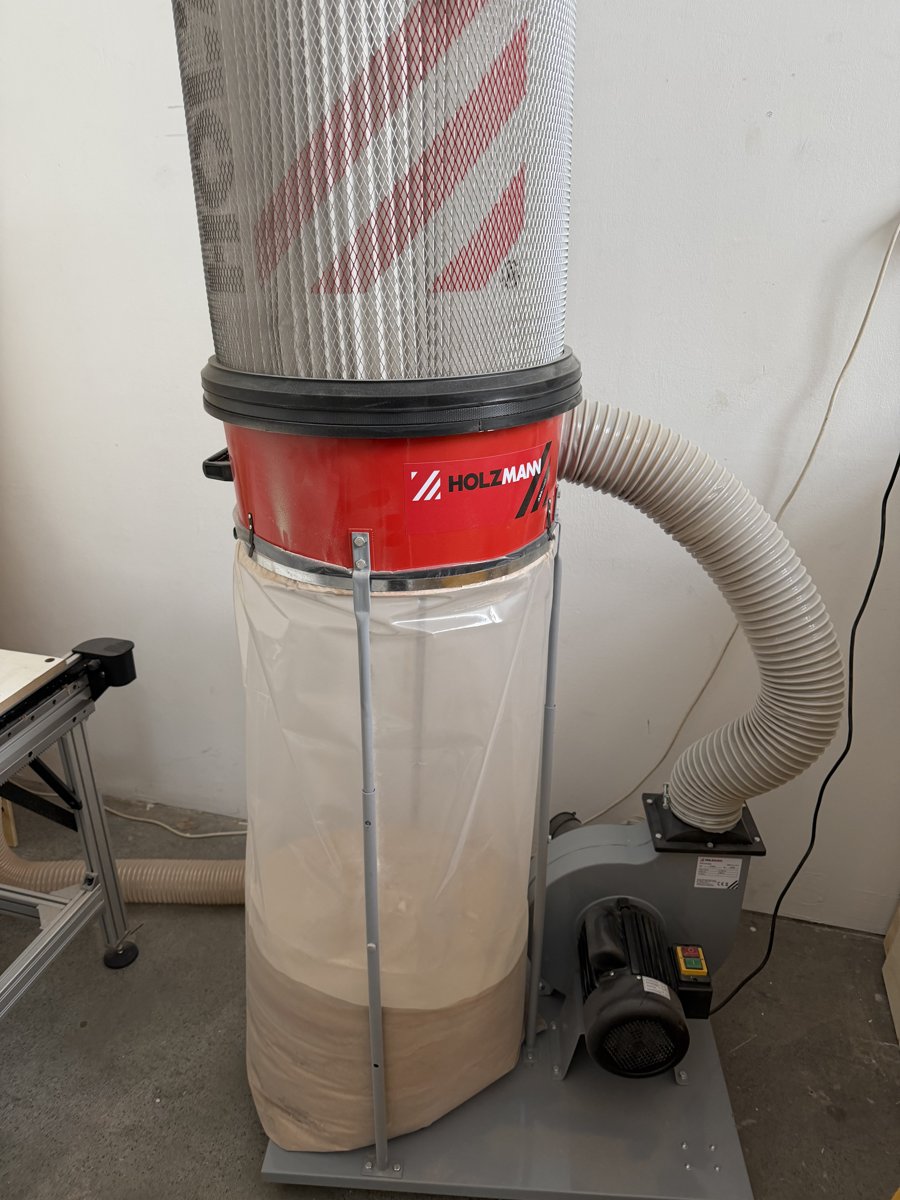 The CNC's dedicated dust collector, right next to the machine. The CNC's dedicated dust collector, right next to the machine. |
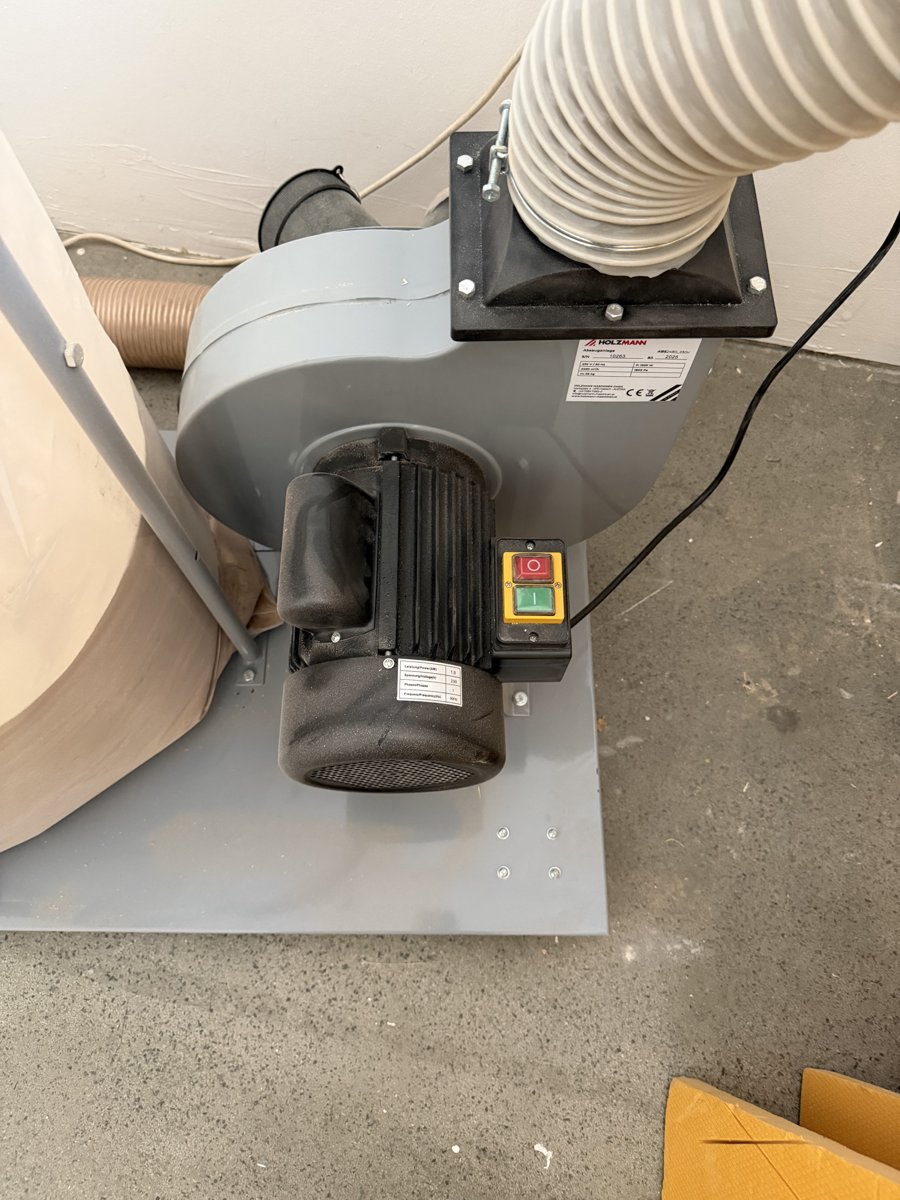 Collector motor/impeller with on/off switch — empty the bag before it's overfull and never vacuum construction debris (drywall, screws) through it. Collector motor/impeller with on/off switch — empty the bag before it's overfull and never vacuum construction debris (drywall, screws) through it. |
Manuals & Resources
- Mekanika Fab CNC product page
- Planet CNC TNG manual (PDF)
- [ ] Internal SOP / checklist (link)
Mekanika Pro CNC
Location: [where in the shop] Training required: [yes/no — link to sign-off form or certification process]
Overview [what's different vs. the Fab model — bigger bed, more power, when to use this one instead]
Key Specifications
| Spec | Value |
|---|---|
| Work area | |
| Max Z travel | |
| Spindle | |
| Controller/software |
Basic Operating Steps
1. 2. 3.
Manuals & Resources
- [ ] Manufacturer manual (link)
- [ ] Internal SOP / checklist (link)
Software
Planet CNC
Used for: Controller software (Planet CNC TNG) that runs directly on the Mekanika Fab CNC's onboard Raspberry Pi — this is what actually drives the machine: homing/squaring, jogging, zeroing, tool-length probing, and running G-code programs. Access: Pre-installed and pre-configured on the machine's onboard computer only. You don't install this yourself or run it from your own laptop — you only need to get a finished G-code file onto the machine (see the thumb-drive step in Basic Operating Steps above).
The content below is adapted directly from Mekanika's CNC Machine Interface Presentation.
Interface Unit
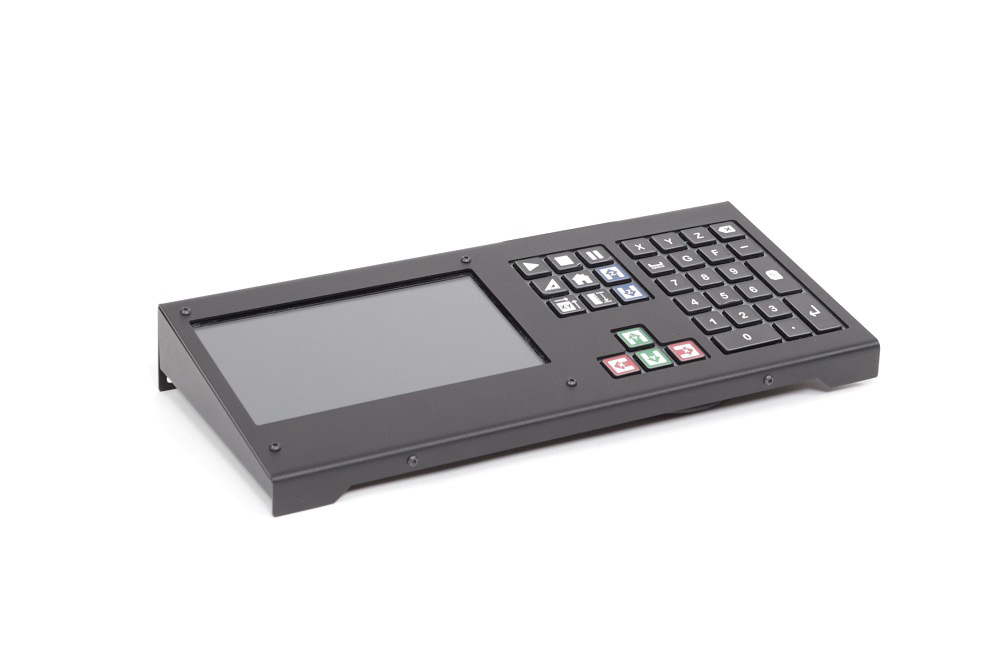
Our machine comes out-of-the-box with an interface unit, which is composed of two elements: a 7-inch TFT touchscreen, and a customized Bluetooth keypad.
The touchscreen allows you to control the machine via PlanetCNC, but also to navigate on the Raspberry Pi if you need to browse folders, edit files, or even browse the web.
The Bluetooth keypad offers an alternative to handle the machine easily and intuitively: most of the keys have been remapped to specific functionalities of PlanetCNC and serve as useful shortcuts to control it.
Main Screen
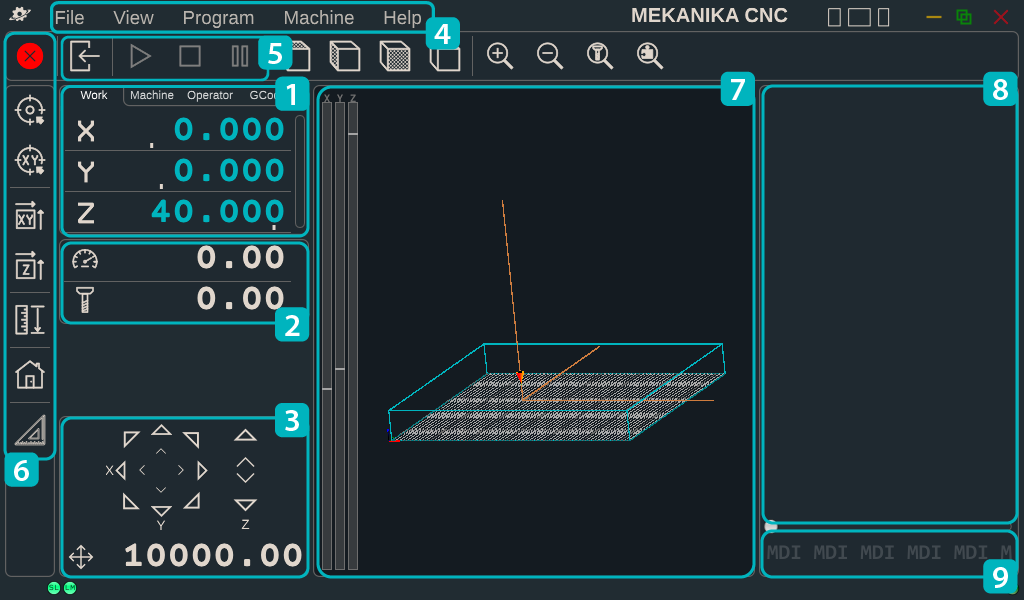
When you turn on the machine, PlanetCNC automatically starts after a few seconds and you arrive at the screen shown above. Here is an overview of the different areas and functionalities of the software:
- X, Y & Z axes current position (working and absolute coordinates of the machine)
- Real-time machine travel speed & spindle rotation speed (Feed & Speed)
- Manual travel speed of the machine and controls (Jog)
- General menu
- G-code control menu (Play, Pause, Stop, ...)
- Machine actions menu (Homing, Tool measure length, ...)
- Graphical interface & 3D view
- G-code panel (current loaded code)
- G-code command line (MDI)
Some functionalities of PlanetCNC are only accessible using the touchscreen, but the most important ones can be quickly activated using the keypad. These functionalities share the same icons on the screen and on the keys.
Axes Coordinates
 |
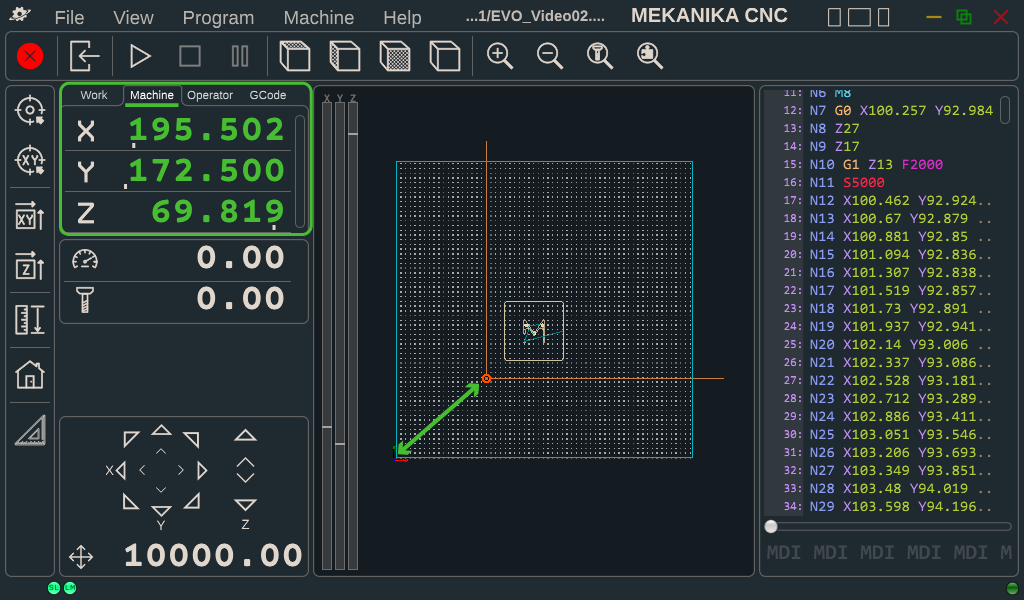 |
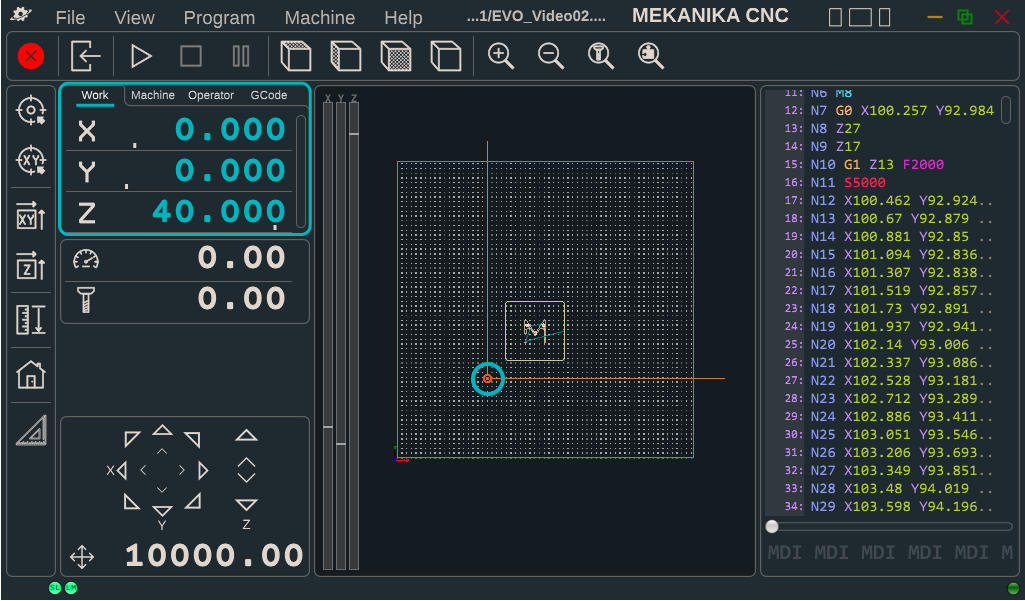
The first section of the screen displays the real-time coordinates of the machine. There are two types of coordinates that you will use:
- Working coordinates, representing the position of the tool relative to the workpiece, displayed in blue.
- Machine coordinates, representing the position of the tool relative to the machine origin, X0 Y0 Z0, located at the front bottom left of the machine, displayed in green.
You can toggle between the two using the tabs, as shown in the images above.
Feed & Speed
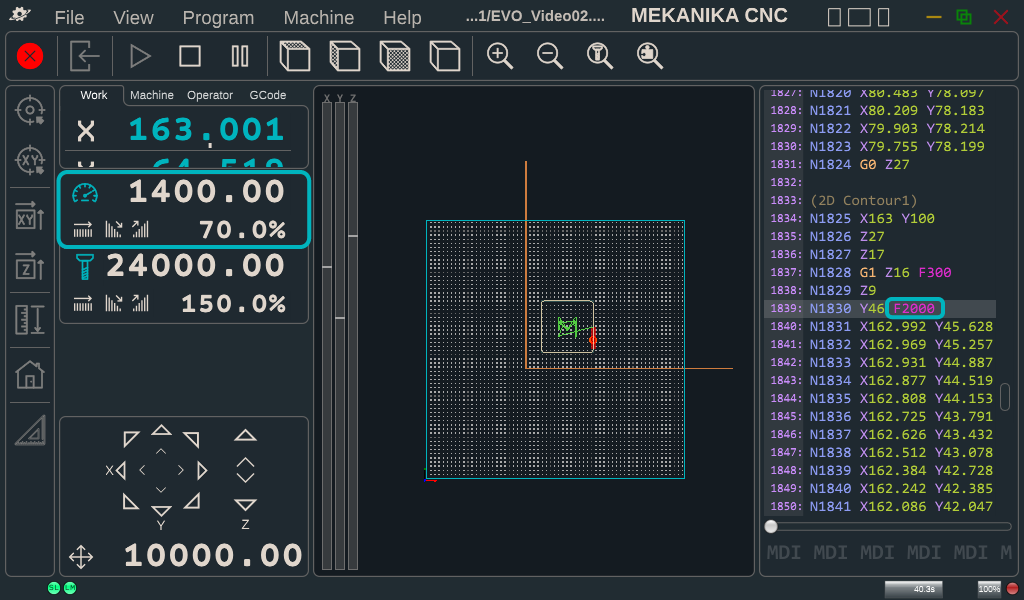
The second section of the screen displays two values: the current travel speed of the machine (also called Feed) and the rotation speed of the spindle (also called Speed), as defined inside the G-code that is loaded in the program.
If you click on the icons, the section expands and shows new functions. They allow you to increase/decrease the feed & speed in real-time while it is working and reading a G-code. For instance, in the image above, the machine is supposed to travel at a speed of 2000 mm/min (Feed F2000), but the speed was decreased by 70% down to 1400 mm/min.
Jog
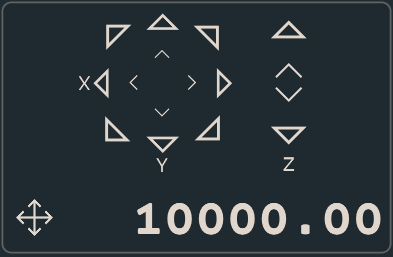
The jog section allows you to move your machine freely, at a certain speed. This speed can be changed by double-clicking on the number indicated on the image above. To move the machine, press on the arrows with the touchscreen or use the equivalent keys on the keypad.
General Menu
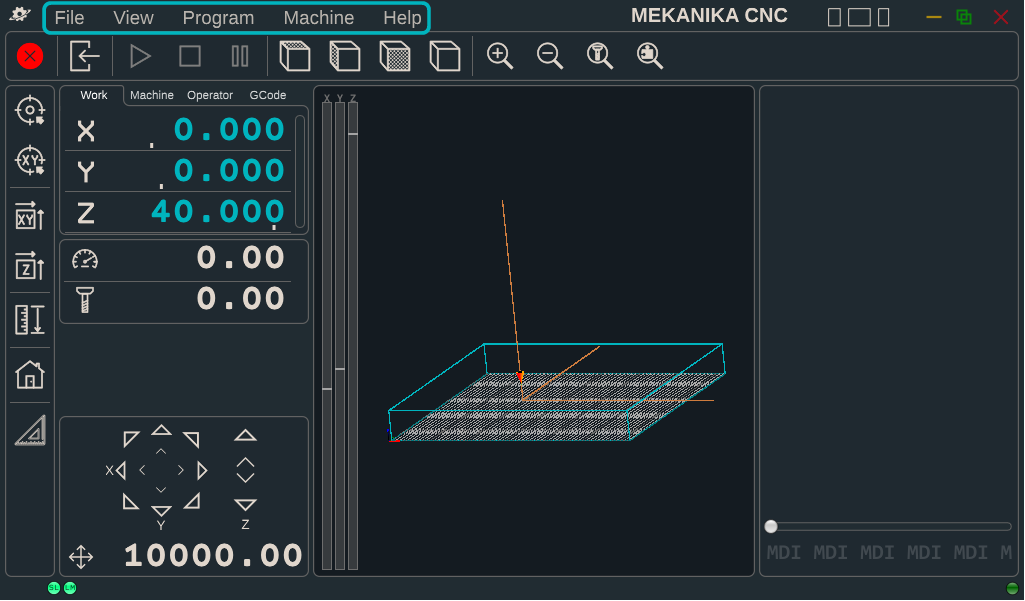
The top bar contains shortcuts to 5 contextual menus, in which you can find all the functionalities of PlanetCNC, including language preferences and settings. For more on these, see the full PlanetCNC TNG documentation, downloadable from the support page of Mekanika's website (linked below).
G-code Control
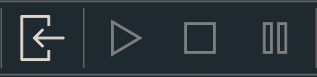
These 4 buttons allow you to:
- Load a G-code file into PlanetCNC
- Start the loaded G-code
- Permanently stop the G-code (can't be resumed)
- Temporarily stop the G-code (can be resumed)
Machine Actions

- Emergency stop. Stops all motion of the machine immediately. Please note that emergency stop should be activated using the physical push-button, not using the touchscreen.
- Go to XYZ zero. The machine will rapidly move towards the X0 Y0 Z0 working coordinates.
- Go to XY zero. The machine will rapidly move towards the X0 Y0 working coordinates.
- Define XY zero. Forces the X0 & Y0 working coordinates at the current location of the machine.
- Define Z zero. Forces the Z0 working coordinate at the current location of the machine.
- Tool measure length. The machine will slowly travel down until it touches the metal part of the probing device. It will then define the Z0 working coordinate to be perfectly aligned with the bottom surface of the device.
- Home. The machine will move along all its axes until it touches the limit switches. This function allows it to reference the absolute origin of the machine.
- Square Gantry. The machine will move along the Y-axis until it touches the limit switches on both sides. This allows you to be sure that the Y-axis of the machine is perfectly perpendicular to the X-axis.
Among these 8 actions, 4 are also available directly on the keypad.
Tip
For more accurate results, start the tool measure length action with the probe device close to your workpiece.
Warning
Before starting the square gantry, bring the machine close to the front since it will move slowly. Never stop that action while it's running, otherwise you will have to reconfigure the Y-axis output (see the troubleshooting guide) — get a shop lead if this happens.
Graphical Interface
 |
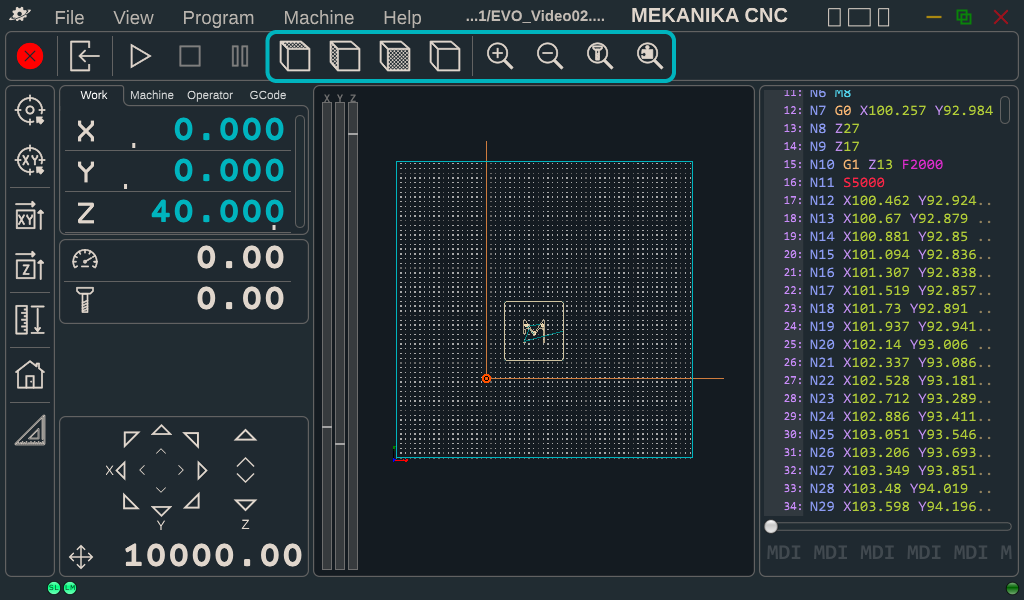 |
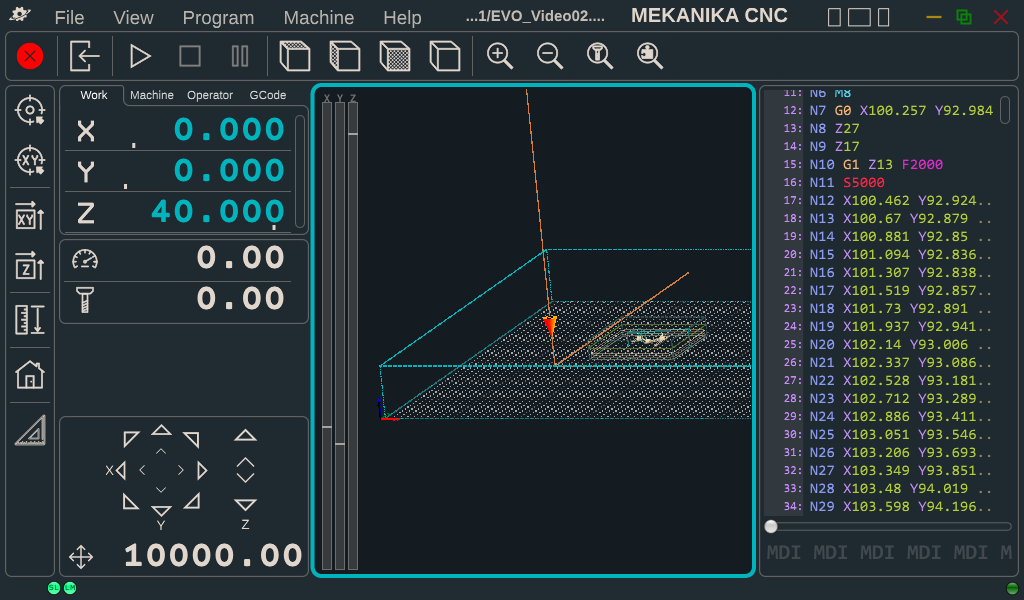
In the middle of the screen, you will find a 3D view representing the reachable XYZ working volume of the machine. The orange cone represents the tool — the central point of the machine from which all coordinates are calculated. If a G-code is loaded, the graphical interface will also display the toolpath that the machine will follow to mill that part.
The toolbar located on top can be used to change the views (top, side, ...), but also to zoom on the workpiece, on the tool, etc.
G-code Panel & MDI
 |
 |
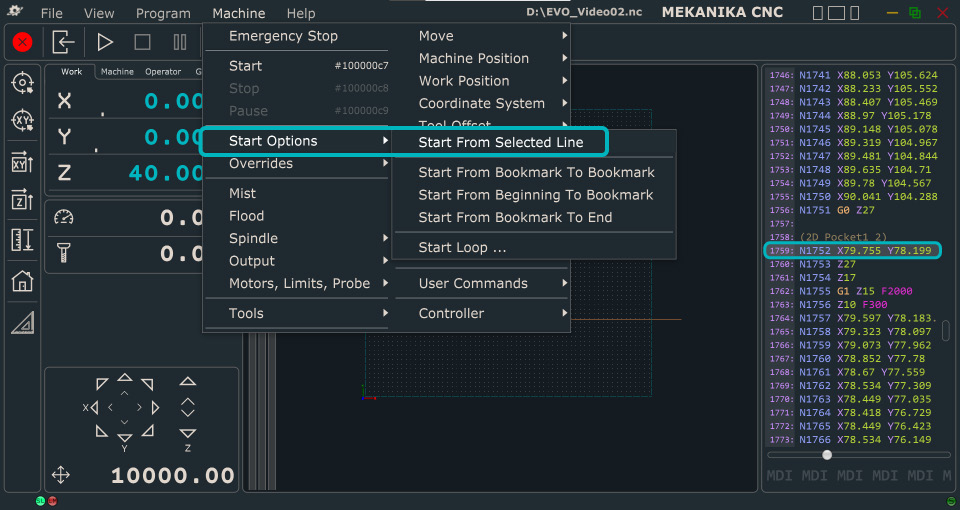
The last section of the screen is used to display the loaded G-code. You can use it to browse your code, to execute it line by line, or even to start operations in the middle of it, as shown in the left image above.
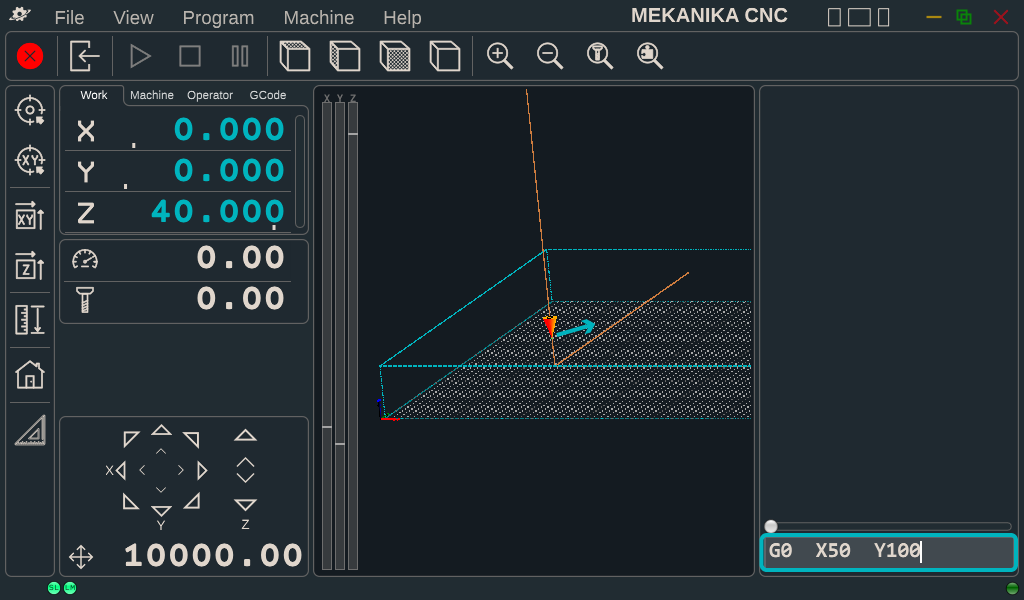
At the bottom of this section, you can find a command line, also called MDI, that is used to type G-code manually and send it directly to the machine. For instance, the command shown in the right image above will move the machine at maximal speed to the working coordinates X50 and Y100. For more, see the PlanetCNC G-code documentation, downloadable from the support page of Mekanika's website.
Raspberry Pi / Touchscreen Usage
 |
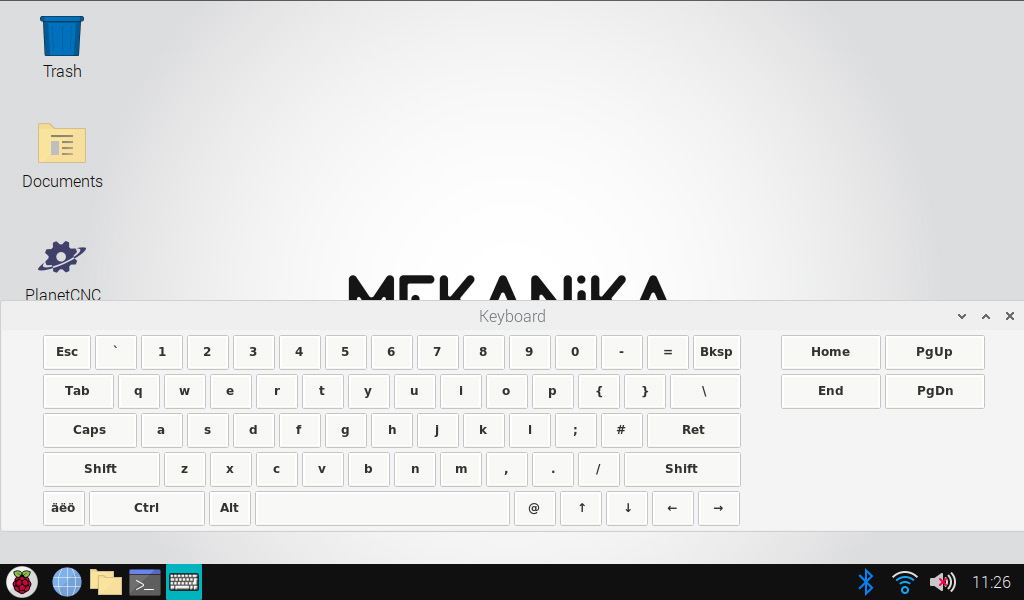 |
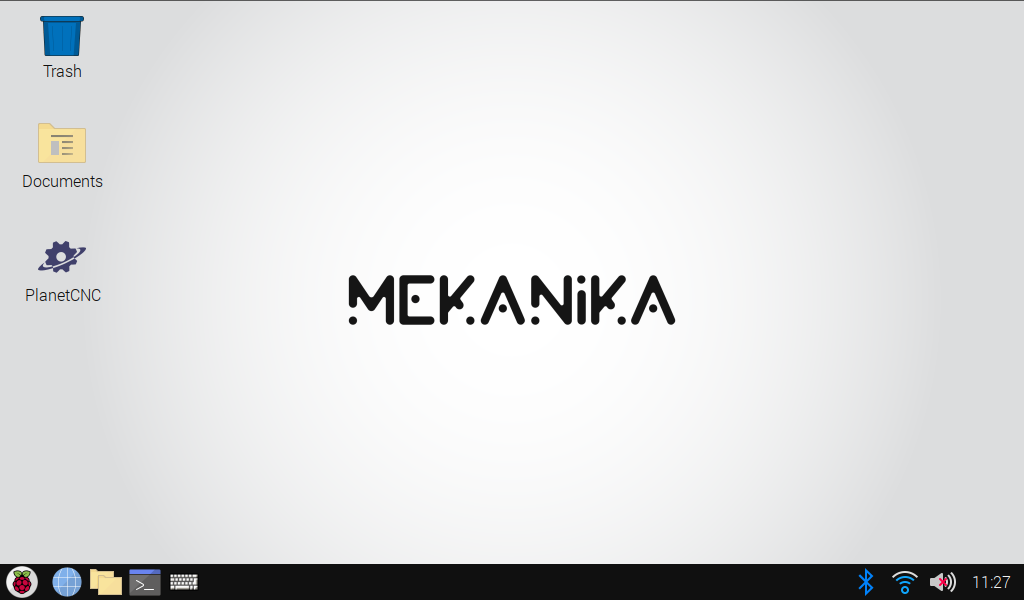
Our machine runs on a Raspberry Pi that is directly connected to the control interface. It means that you can use it as you wish to organise your files, browse the web, etc. You can access the desktop by minimizing the window of PlanetCNC.
Like with a smartphone, if you want to open a file or a program, simply press the icon once. If you want to right-click, press the icon longer and the contextual menu will appear. Lastly, if you need to type some text, you can open the virtual keyboard by clicking the taskbar icon.
Resources
- Planet CNC TNG manual (PDF)
- Planet CNC support / FAQ
- Mekanika's CNC Machine Interface Presentation (source for this section — ask a shop lead if you'd like the original file)
VCarve
Used for: [CAM software for the CNC — toolpaths, v-carving, etc.] Access: [license seats / where installed]
Basic Workflow [design → toolpaths → post-process → g-code]
Resources
- [ ] Getting-started guide (link)
Fusion (Manufacture / CAM)
Used for: [CAM toolpaths from Fusion 360 models] Access: [license notes — student/education license, etc.]
Basic Workflow [model → CAM workspace → toolpaths → post-process]
Resources
- [ ] Getting-started guide (link)
SolidWorks
Used for: [CAD modeling prior to CAM in VCarve/Fusion] Access: [license notes]
Basic Workflow [design intent → export format used for CAM]
Resources
- [ ] Getting-started guide (link)
Materials
[Approved materials list — what's safe to cut on the CNC, thicknesses supported, and anything explicitly prohibited (e.g. no PVC/vinyl due to toxic fumes, no metals unless specified).]
| Material | Max thickness | Notes |
|---|---|---|
Prohibited materials
[List anything never allowed — e.g. PVC, unknown/reclaimed material without ID, etc.]
Tool Settings
[Reference table for bits, speeds, and feeds by material. Fill in once tested settings exist.]
| Material | Bit/tool | Spindle speed | Feed rate | Notes |
|---|---|---|---|---|
Spindle speed
Mekanika's own reference recommends running the router spindle around 18,000–20,000 RPM as its sweet spot. VCarve's default tool-database settings are often much lower (e.g. ~10,000 RPM) — running faster than the software default is generally fine, but expect more heat/smell on soft material like MDF at high RPM. Always use climb milling (VCarve's default) rather than conventional — conventional cutting exists for old, loose manual mills and has no benefit on this machine. Ramping plunge moves (angled entry instead of straight down) are recommended over straight plunges to extend tool life, though not essential for simple MDF jobs.
Safety
Required before first use
Hands-on sign-off with a shop lead is required before independent use — this covers the home/square sequence, tool changes, zeroing, and emergency procedures below. Don't dive into machine configuration/settings yourself; if the machine throws an unexpected warning (e.g. a frozen axis after a bad Square), stop and call a shop lead rather than troubleshooting it yourself.
- PPE: Safety goggles and hearing protection are mandatory any time the machine is cutting — this applies even if you're just sitting and watching. No loose clothing, sleeves, or jewelry, and tie back long hair, especially around the tool-change/collet area.
- Homing and squaring: Every session starts with Home immediately followed by Square, with nothing in between — this re-syncs the two motors driving the Y-axis gantry. Only press Square right after a fresh Home; doing it at any other time can freeze an axis and requires a shop lead to fix.
- Tool and collet handling: Cup a hand under the tool when installing it in case it slips out of the collet — dropping a bit on the concrete floor can crack it invisibly. Hand-tight only on the collet wrenches; over-tightening deforms the collet and actually loosens its grip.
- Z-probing: Before probing an unfamiliar tool's length against the fixed conductive sensor, confirm the tool is electrically conductive (steel and carbide are; some coatings aren't) — check with a continuity tester at the electronics bench first if unsure, or jog down manually and slowly with a finger on the emergency stop.
- Spindle start check: Always confirm you can hear the spindle spinning before a cutting pass starts. If you start a program without enabling the spindle (via your membership card), it pauses briefly on the line that tries to turn the spindle on — that pause is your cue to hit emergency stop if you don't hear it running, rather than let a stationary bit plow into your material.
- Dust/fume extraction: Run the dedicated CNC dust collector for any real milling, pocketing, or contour pass. Never vacuum construction debris (drywall dust, screws) through it — the filter is coarse and made for wood dust only.
- Emergency stop: The E-stop is the large red mushroom button on the machine's control box. Pausing a program does not stop the spindle from spinning — if you need to fully stop, hit emergency stop or explicitly turn the spindle off, and be mindful of where the tool ends up before doing so.
- Idle/inactivity monitor: The control display will prompt you every so often to confirm you're still there; if you don't respond within about 30 seconds it starts beeping, and will shut the machine down if you keep ignoring it. Don't rely on this as a safety feature — it's a presence check, not a guard.
- Never leave the machine unattended while it's cutting, and don't reach into the working envelope while the program is running.
- Emergency procedures: [who to contact, first aid location, incident reporting process]
FAQ
Q: How do I get my design file onto the machine? A: Design at home or on the shared Makerspace computer (Fusion free version or VCarve), then transfer the finished file to the CNC's onboard computer via a USB thumb drive, or by downloading it from your own cloud storage directly on the shop computer. If you use cloud storage, log out afterward and delete the file from the shared computer once you're done — for both your design's privacy and to keep the shared desktop from filling up with old files.
Q: Can I bring my own material? A: [confirm shop policy]
Q: What file formats does the CNC / VCarve accept? A: DXF, SVG, AI (Adobe Illustrator), and EPS for 2D vector cutting (EPS tends to be the most compatible); STL for 3D relief/sculpted cuts. Fusion's free tier can export any of these from a flattened sketch — just make sure your sketch's origin is set sensibly before exporting, or your vectors may import offset from where you expect.
Q: Can I cut a job that needs more than one tool? A: Yes, but it currently requires manual intervention — the post-processor doesn't fully automate tool changes yet. The program will pause and raise the Z-axis when it's time to change tools; you then swap the bit, re-measure its length against the bed, and resume. Where possible, splitting a job into separate single-tool programs is simpler and less error-prone than relying on the automatic pause.
Q: I forgot to turn on the spindle before starting — what happens? A: The program pauses for a few seconds on the line that tries to spin up the spindle, then continues regardless of whether the spindle is actually running. Use that pause window to hit emergency stop if you don't hear the spindle — don't assume the software will catch the mistake for you.